Three major enhancements have been added to the Mastercam 2024 B-Axis Contour Turning operation. They include:
- Ability to manually edit tool axis vectors.
- Ability to manually edit usable insert area.
- Adjust stock function.
Together, these new features give you even more control over how their tool contacts the part. These enhancements further the optimization of tool life and surface finish, while also streamlining the workflow. In today’s post, we will cover the first enhancement – Editing the Toolpath Vectors. Please stay tuned for future articles to learn about the other two enhancements.
Editing the Toolpath Vectors
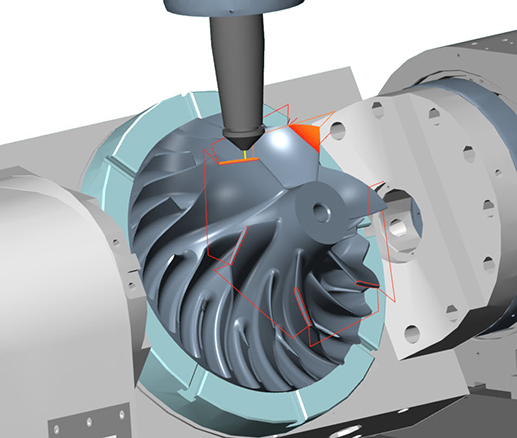
If you have manually defined the tool axis vectors, Mastercam now lets you edit them after they have been created. Do this to fine-tune the resulting tool path without editing or creating additional geometry.
The new options are on the Basic Motion Control page. Select Modified, and then click the Edit Vectors button.
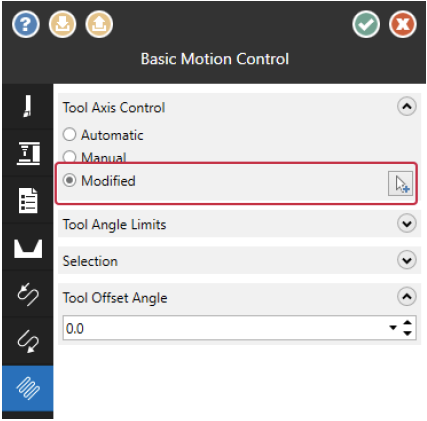
Mastercam displays the current tool axis vectors in the graphics window. Click on a vector and use the angle dial to rotate it to the desired orientation. Press the [Shift] key to display an outline of the tool along with the vector. While you are editing the vectors, the tool rotation is stopped and the boundary is displayed in red if a collision is detected.

Press [Enter] to return to the function panel. Mastercam does not edit the original wireframe geometry that was used to create the initial tool axis vector.
Note that if you are working with a part that was created in an earlier version of Mastercam with the Automatic setting, you will need to regenerate the part before the Modified option is available.
Stay tuned for our next post when we cover the “Ability to manually edit usable insert area.”

Leave A Comment