
Liquid Silicone Rubber Molds with PolyJet
Liquid Silicone Rubber is a broadly used non-reactive compound. Its high resistance to extreme environments and temperatures make it a perfect seal material for aerospace, defense, and automotive components, but it is also used in sporting goods, medical devices, and consumer products. Unlike traditional thermoplastics which are melted before injection molding, LSR starts as a liquid which then cures into a solid after injected into a heated mold. It has a lower viscosity, which allows for shorter cavity fill time, but a parting line can sometimes be visible in finished parts. Mass production of LSR parts requires specialized injection molding machines that meter, mix, and inject into molds. Prototyping in this manner is cost prohibitive, so prototypes are instead made through manual casting methods using modeling boards, RTV rubber, or soft metal. Although cheaper to produce, they require significant time and labor, and there are limitations to geometrical complexity. PolyJet technology can be employed to produce LSR molds with smooth surfaces. With the achievable layer thickness of 16 microns, PolyJet can create highly detailed molds, which in turn generate LSR parts with fine surface finish. Upon completion of the CAD design, the mold can be printed overnight without operator attendance, and complexity doesn’t [...]
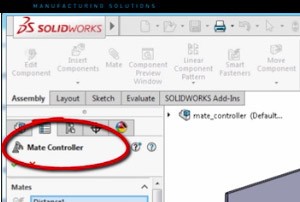
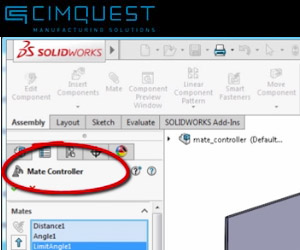
SOLIDWORKS 2016 Mate Positions
SolidWorks 2016 includes an enhancement for creating and editing mates that will allow you to manipulate specific mates such as: angle, distance, Limit Angle, Limit Distance, Slot, and Width mates all in one convenient table called the Mate Controller. In Mate Controller, you can show and save the positions of assembly components at various mate values and degrees of freedom without using configurations for each position. You can also create animations based on the positions you define in Mate controller. Consider this assembly where a series of mates dictates the placement of each part. Go to Insert > Mate Controller, and in the Property Manager, under mates, click collect all supported mates. Notice that three mates appear in the list. Under “position 1” you’ll see three current values for the mate. Enter the mate values for the next position. You can see the components move to the new positions in the graphics area as you change the mate values. Under mate positions, click add position in the dialog box to name position enter position 2 and click ok. Position 2 is created from the mate values you entered. Enter the mate values for the next position and click add position. In the dialog [...]
3D Printing and Thermoforming Applications
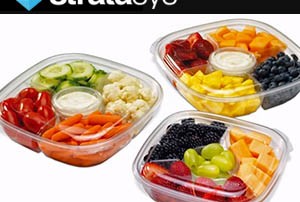
Thermoforming is a process in which sheets of extruded plastic are formed into custom shapes. The process begins by heating a sheet to an elastic or pliable state. After the plastic softens, a mold is placed under the sheet, and the sheet is drawn onto the mold by either a vacuum or air pressure. Upon cooling, the plastic takes the shape of the mold, forming a finished solid part. Thermoforming is a widely adopted process in the packaging industry, most notably for food containers. But it can be utilized in the production of larger products & technical items, for example, car body applications, aerospace, mass transit parts, and even panels for refrigerator doors. Advantages include flexible wall thicknesses, short cycle times, high output, and the ability to produce heavy parts. It is also cost-efficient for small volume lots, and modifications are practical from a cost perspective. Traditional methods require aluminum or wood molds produced on milling machines, and prototyping calls for considerable time, labor and machining costs, which can limit the ability to test multiple designs. Manual drilling of vent holes is also required, which can potentially cause unevenness and increased overall time to market. 3D printing with Fortus FDM machines provides an [...]
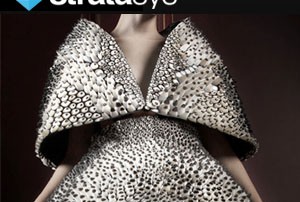
3D Printing Comes to Boston’s Museum of Fine Arts
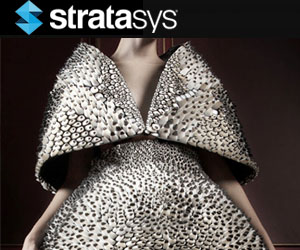
partial repost from http://www.usnews.com Fashion, movies and athletic footwear companies are among the latest users of 3D printing. Boston has a storied tradition of textile manufacturing, and, in more recent history, a tech scene. In its current exhibition, #techstyle, the city's Museum of Fine Arts looks to the future and at how some designers have interwoven fashion with technology. This 3D dress and cape is part of the #techstyle exhibit at Boston's Museum of Fine Arts. Boston has a storied tradition of textile manufacturing, and, in more recent history, a tech scene. In its current exhibition, #techstyle, the city's Museum of Fine Arts looks to the future and at how some designers have interwoven fashion with technology. A source of inspiration for the show, which opened recently and will run through July 6, was the museum's acquisition of Anthazoa 3D Cape and Skirt, a 3D printed garment designed by Neri Oxman and Iris van Herpen, part of the 2013 Voltage Collection and printed by Stratasys. The introduction provides a historical perspective, showcasing the work of established designers such as Alexander McQueen, whose 3D printed Alien Shoe from his Spring/Summer 2010 Plato's Atlantis collection demonstrates what Parmal describes as one example of [...]
Getting the Most Out of Employee Training
Last week, we covered the Top 5 Reasons to Train Your Employees and now it’s time to discuss how to get the most out of their training. You’re making a big investment when you carve out time and money to send your employees to training. It’s important to get the most out of it and here are some things to consider. What is your plan for training your employees? Do you have specific goals in mind? Have you ever sent employees out for training and wondered if they learned anything that is relevant to what they do? There are many questions you should ask before and after your employees go off to training. Was there an end objective or training plan for the employee? What are the key points that would make the training successful? Many times there is a need for a particular skill to match current or upcoming work so you try to find someone to match the skill(s) or someone who could be trained to match it. In some cases HR is tasked to find training that sounds like it meets what this skill might be. There may be local state and/or federal funding available and this becomes the driving [...]
Limited Time Stratasys Promotions
Stratasys 3D Printers are revolutionizing the way in which new products are developed. Through additive technology, you can experience substantial lead time and cost savings while achieving greater freedom over your design process. For a limited time, we're running some great promotions on materials and trade-ins, and even a Buy One Get One on 3D printers. To learn more about all of our current 3D Printing promotions, please click the button below. Sales Promos