Nuevo Interfaz
http://cimquesttv.wistia.com/medias/tcuk0a2a25?embedType=async&videoFoam=true&videoWidth=640 El nuevo interfaz 2017 ofrece una nueva cinta con pestañas parecidas a las de MICROSOFT OFFICE. Esto facilita el localizar las funciones que necesiten, y en últimas instancias, aumentar velocidad y flujo de trabajo.

Stratasys J750 Roadshow Events
Cimquest will be hitting the road next month to introduce and promote the latest printer from Stratasys – the J750, the world’s fist full-color, multi-material 3D printer. You won’t want to miss the opportunity to see this new printer in action. Come see how to achieve an entire new level of product realism and aesthetic performance with the Stratasys J750. We’ll have a detailed presentation covering the machine, including its true color capability of more than 360,000 possible shades and ability to print textures and gradients. You’ll get to: See live demos of J750 and other Stratasys machines Hear about diverse 3D materials range, including PolyJet blended materials Examine realistic 3D parts including functional prototypes, tooling, and medical models Learn about popular applications for 3D printing Enjoy great food and a chance to win raffle prizes If you are a product designer, an engineer, or a manufacturing technician you should mark your calendars now. We will be presenting the Stratasys J750 at the following locations: NewLab September 12, 2016 12:30PM – 4PM Building 128, Navy Yard 63 Flushing Ave. Brooklyn, NY 11205 Cimquest Headquarters Septmeber 14, 2016 12:30PM – 4PM 3434 Rt. 22 West Branchburg, NJ 08876 Hollywood Casino September 15, 2016 12:30PM [...]
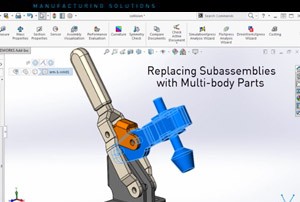
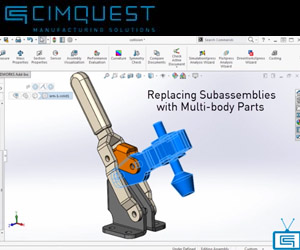
SolidWorks 2016 – Replacing Sub-assemblies with Multi-body Parts
Today we will explain how to replace subassemblies with multibody parts, a new function in SolidWorks 2016. Unlike previous versions of SolidWorks, in 2016 you can use a multibody part as a simplified representation of the assembly. When you make changes to the subassembly and save an updated multibody part, this version can replace the older copy without having to recreate the mates. Consider the assembly shown above. It contains two individual parts and two subassemblies. You can open one of the subassemblies and save it as a part while maintaining all geometry references. This part contains four solid bodies derived from the four original parts in the subassembly. To replace the subassembly with this multibody part in the main assembly, simply right-click on the subassembly and select Replace Components. Select or browse for the multibody part. Here is where you will confirm the position of the multibody part within the assembly with a series of existing mates. Take note of how all bodies of the part are constrained to their original position. When a subassembly is saved as a multibody part, the mates between parts of subassemblies are saved as internal data inside the new part. This is useful when you use [...]

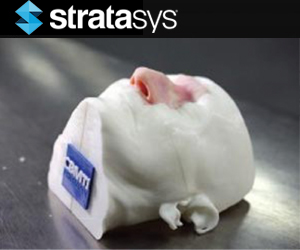
Customized 3D Printed Medical Models
3D printing is making a profound difference at the University of Malaya’s Centre for Biomedical and Technology Integration (CBMTI). CBMTI uses Stratasys’ PolyJet 3D Printing technology to deliver a range of services including custom medical implants, prototypes for new devices and patient-specific models for surgical planning. But perhaps the greatest impact is in creating sophisticated training simulators for clinical procedures. Ear, nose and throat simulation model in three parts. At CBMTI’s inception, neurosurgeons were mentoring on live human cases, and practicing on cadaveric dissection and computer simulations. Its first 3D printer made spatially accurate models in a single material, but did not mimic human pathology without a costly, time-consuming post process. This changed when they acquired Stratasys PolyJet 3D printing technology. “Once we got the Stratasys multi-material 3D Printer, we were able to 3D print medical models that could, for instance, mimic the texture of the nose, the linings, and the harder tissue at the back of the nose. We found this very useful, especially in teaching trainees how to handle different materials,” said Vicknes Waran, MD, director of CBMTI. Better Prepared with Realistic Patient-Specific Models CBMTI now 3D prints detailed multi-material models that mimic real anatomy, even down to a [...]
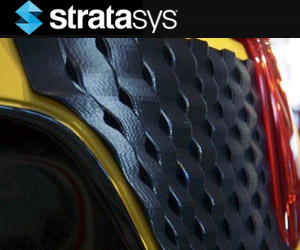
3D Printed Mass Customization for Daihatsu’s Copen Cars
Daihatsu Motor Company, known for manufacturing compact, lightweight cars, will offer customers customized design elements for car exteriors. Customers will be able to customize their Copen Convertibles with Stratasys 3D printed effect skins. Stratasys FDM 3D printing technology was used to “build” these three-dimensional patterns, called Effect Skins, for the front and rear bumpers of Daihatsu’s Copen 2-door convertible. “Using Stratasys 3D Printing technology to customize and supply parts to customers and to allow self-expression within a single car is, I believe, a first,” said Osamu Fujishita, General Manager, Corporate Planning Department, Brand DNA Office, Daihatsu Motor Co., Ltd. Daihatsu Copen owners will be able to choose from 10 Stratasys ASA 3D printing material colors and 15 base patterns to create their own signature designs. The auto experts at Daihatsu collaborated with designer Kota Nezu and 3D modeling artist Sun Junjie. Nezu’s firm, Znug Design, manages planning and design for industrial products, such as cars and motorcycles. Junjie has had extensive experience in fashion, as well as a deep understanding of what Stratasys 3D printing solutions have to offer, but had never worked with the automotive industry. The pair developed more than a dozen base patterns of Effect Skins in 10 different colors; [...]
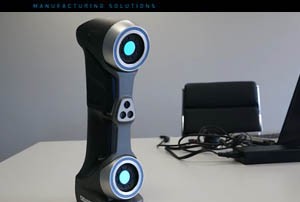
Handy Scan – Versatile Metrology Solution
The Handy Scan 3D 700 is a portable yet versatile metrology solution from Creaform. Through 3D scanning, companies can effectively conduct reverse engineering and inspection operations throughout the product development process. The Handy Scan is a handheld laser scanner optimized to meet the demands of engineers. It features 7 lasers that produce a highly detailed point cloud from physical parts and assemblies. To setup the scanner, simply connect it to a laptop or workstation with a USB and power cable. Next, you stage your part by placing the targets, which will enable the lasers to triangulate and generate the scan data. Surprisingly enough, you can be up and running in just a few minutes. There are several great features about this scanner. For example, it features multi-functional buttons that allow me to do things like adjust the zoom, the shutter, and even initiate my scan without having to go back and forth to your computer. Another benefit is its accuracy and speed. It produces scans with tolerances of up to 30 microns and has one of the highest measurement rates on the market, 480,000 measures/s. This allows for timely scanning in an age where speed is critical to success. Finally, its ergonomic design [...]