
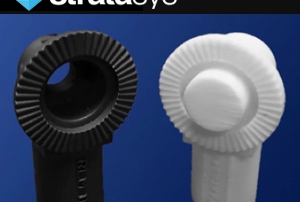
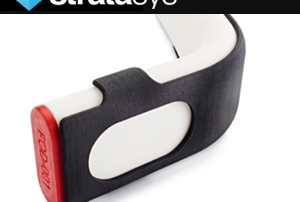
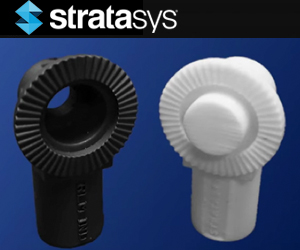
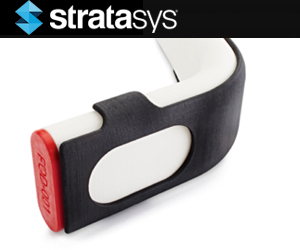
3D Printed Custom Earphones
Normal is a company in New York City that is using 3D printing to develop a gadget that many of us rely on every day - earphones. Earphones are a cherished component of smartphones, mp3 players, tablets, and computers. In the earphones industry, there are a wide variety of options available, ranging in size, shape, material, and sound quality. But even with this abundance of choices, it can be difficult to find a comfortable pair that fits perfectly in your ear and remains tight in place through basic activities. At Normal, CEO Nikki Kaufman’s frustration with ill-fitting headphones fueled her desire to find a design solution. She discovered that the only application currently used for customization was silicone molding, a process which can cost up to several thousand dollars per unit. But her knowledge of additive manufacturing lead her to come up with the idea to use 3D printing as a primary method of production. By using Normal’s mobile app, or visiting Normal’s retail headquarters in Chelsea New York, consumers simply get photos taken of their ears. Normal processes the photos, and then 3D prints the lobe attachment with ABS thermoplastic, using a Fortus 250. The earphones can be printed in a variety of [...]

3D Printing End of Arm Tools
Robotic arms carry out a wide range of functions in this modern age of manufacturing. The end of arm tool (EAOT) of a robot is the key piece which engages with an object, for example through gripping or welding. With FDM technology, companies can now produce custom end of arm tools tailored to sophisticated applications and processes, at a fraction of the cost.

SolidWorks 2016 – Improved Interface & Icons
SolidWorks 2016 offers an improved interface with a balanced color scheme and flexible customization. It supports high pixel density displays and will respond to Microsoft Windows scale settings. For information on all of Cimquest's solutions, visit https://cimquest-inc.com/
Using FDM Tooling in Investment Casting
Let’s explore investment casting and how FDM tooling can be employed in this distinctive process. Investment casting, also known as lost wax casting, is a centuries old process used to produce metal components with intricate geometries and precise details. In this process, molten metal is poured into a ceramic cavity, which is formed by a wax pattern. The wax pattern is dipped into a ceramic slurry, and then melted out once the ceramic shell hardens. Metal is poured into the shell and after cooling, the shell is broken and removed, revealing a finished end-use part. The advantages to this process are great surface finish, high dimensional accuracy, endless shape potential, and the ability to fill very thin sections. It is generally used in applications that have relatively low production quantities and changing product designs. Injection molds are typically used to form the wax patterns. However, since investment casting is used for intricate designs, these molds require complex core assemblies and can cause parting line flash. In addition, lead times to produce these molds are approximately two months, with high costs ranging between $5,000 to $25,000. A big problem for foundries is they cannot produce any castings until the wax mold is complete, so [...]
3D Printing Manufacturing Aids, Jigs, and Fixtures
(Excerpt taken from an article on www.machinedesign.com) Additive manufacturing allows engineers to test and make design adjustments without a capital investment in hard tooling. The lack of tooling makes it ideal for one-off parts like custom manufacturing aids. Two of the more popular 3D printing processes used in the creation of manufacturing aids are Fused Deposition Modeling (FDM) and Laser Sintering (LS). FDM deposits heated filament, similar to a hot glue gun. FDM can create complex parts using water-soluble support material to provide more design freedom. The LS process melts designs in a bed of powdered material that negates physical supports allows for intricate, interweaving, no-access features. Both LS and FDM processes use engineering-grade plastics with heat, smoke and toxicity ratings, chemical resistance and even materials with Federal Aviation Regulations (FAR) 85.853 ratings. Plastics used in LS and FDM processes are also lightweight compared to machined metals traditionally used for manufacturing aids. Thanks to design freedom, 3D printing allows for consolidated features, thereby reducing the total number of components and amount of material necessary to build complex parts. These material properties, along with a history of performance in the transportation, aerospace, and other high-impact fields, have made FDM and LS valuable processes for [...]
test video post
Test post for video fromat