
3D Printing For High Thermal Stability
Formlabs is pleased to announce the latest formulation of High Temp Resin, part of their library of Engineering Resins for the Form 2 desktop stereolithography (SLA) 3D printer. High Temp Resin offers the highest heat deflection temperature (HDT) among Formlabs resins and is suitable for printing detailed, precise parts with high thermal stability. The new formulation, shipping now, has an HDT of 238 °C @ 0.45 MPa and improved elongation to decrease brittleness. Over the course of the last year since Formlabs first released this material, they talked with a variety of engineers and product designers using it to better understand its applications, strengths, and opportunities to improve. They have determined that this is a very capable resin in the field, and the latest formulation is a direct result of customer feedback to make it even better. High Temp Resin in Action Professionals across industries are using High Temp Resin in a variety of exciting and inventive workflows, and in some cases, people buy their first Form 2 specifically to access this resin and its unique properties. Product Development: Hot Air, Gas, and Fluid Flow Functional testing of prototype parts that come into contact with high heat can prove challenging, as many prototyping [...]

Happy Holidays
We would like to take this opportunity to wish you all a very happy, safe and prosperous holiday season. We will be closed tomorrow to celebrate Christmas, but we will be back to business on Wednesday, Dec 26th.

We Are Here For You
The holidays are approaching and we realize that many people and businesses take extended time off to celebrate. But we also realize that many other companies are very busy with work and don’t have that luxury. Cimquest strives to be there when you need us and therefore we will be staffed for those last minute urgent customer service calls that can occur right thru to the end of the year. We will be here for you through the holiday season and will only be closed for business on Christmas and New Years Day.
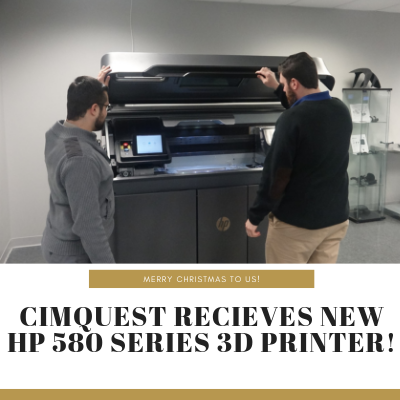
Cimquest Receives New HP 580 Series 3D Printer
We are excited to be one of the first five companies in the US to receive our new HP 580 Series 3D Printer! The machine is fully installed, and we have started to build parts. Tailored for small/medium-sized development teams, design firms, and universities, HP’s new printer is a compact solution for producing injection mold quality parts. This automated system integrates material mixing and loading, printing, and reclaiming material in one machine. Teams can accelerate their design cycle by producing prototype iterations or functional parts without tooling, at a faster pace compared with traditional 3D printing technologies. Learn more about this machine here.
Solidworks Slicing Tool
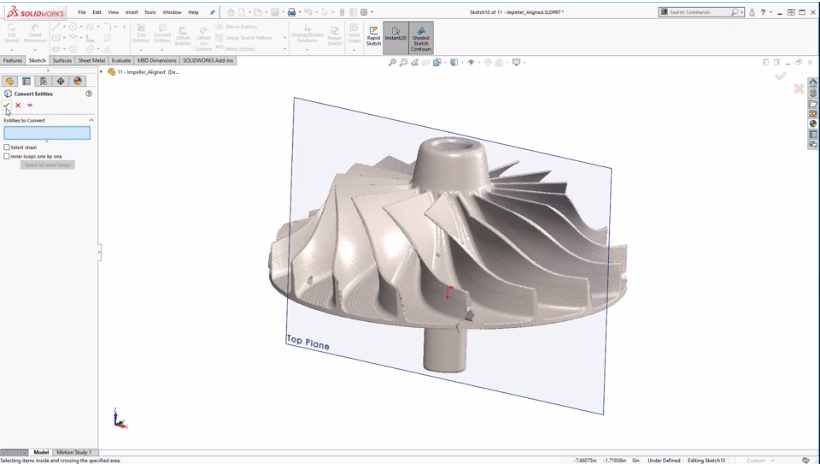
This post will explain the new functionality in SolidWorks 2019 called Slicing. Scanning is becoming more and more prevalent in the engineering world. Whether you want to scan geometry just to back up your design or scan to recreate and make modifications, it's becoming more and more easy to start from a scan. Once done, you export the scan as an STL. The challenge comes when trying to utilize an STL file as graphics bodies in SolidWorks. You are not able to select anything on the body, nor can you trace or work off of the geometry. Although there are different workarounds for this, SolidWorks 2019 came up with yet a new way to be able to leverage and trace Graphic Bodies, Mesh BREP geometry, and SolidWorks BREP geometry. This new tool is called Slicing. In the example below, we have a Graphics Body of an impeller, which was scanned and then imported as an STL. To start the Slicing Tool, go to Insert > Slicing. At that point you select your base Slicing plane, the number of additional slicing planes that you would like to create, and the offset distance between. Once you click on the green check mark, SolidWorks creates 2D sketch [...]
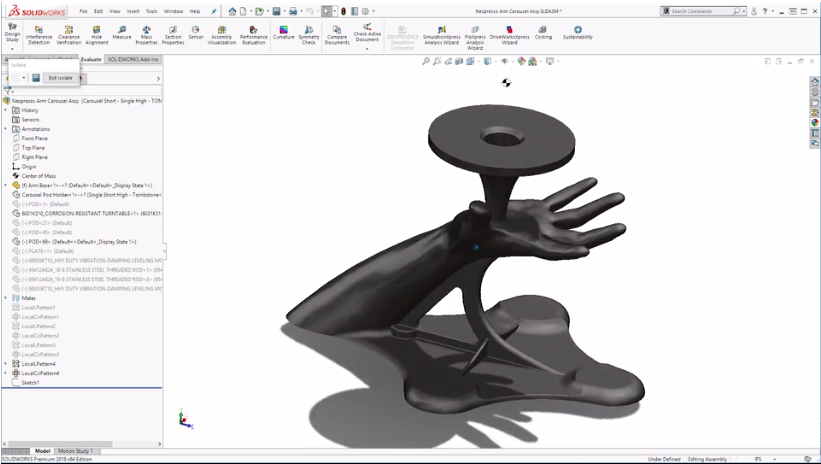
The Process of Importing Organic Shapes
In this article, we go into more details about the process of importing organic shapes into CAD. We will explain how we created a custom coffee pod holder by scanning a human hand and including it in the CAD design. The first step involved capturing the geometry. There are many different 3D scanners out, all of which vary in accuracy, resolution, and light technologies. In order to facilitate the scanning of the hand, we used a structured white light scanner, which does not require positioning targets. Once the data was acquired, the second task involved data clean up. Using mesh editing software like Geomagic Wrap, we were able to easily post-process the data, optimize the mesh quality, and thicken it, and then align it to a World Coordinate System. We needed to ensure that we had a water-tight mesh and then we needed to take that data and convert it to something manageable and useable in CAD. Instead of exporting each of the thousands or millions of triangles into CAD, we used Geomagic Wrap to create B-Rep surfaces, group the triangles into surface patches, and create a solid body. At this point, we exported this body as a non-parametric neutral CAD file, like [...]