Order 3D-Printed Jewelry Samples Before You Buy
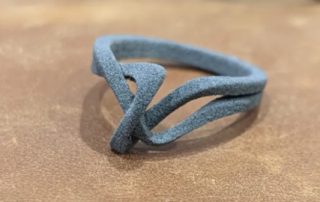
pic by Lace by Jenny Wu Jenny Wu is a Los Angeles-based jewelry designer that uses her architectural background to create complex designs for her necklaces, rings and bracelets. Her company, Lace by Jenny Wu, makes 3D-printed jewelry in a lot of beautiful designs using SLS -- Selective Laser Sintering -- to essentially melt a powder into shape using lasers as well as printing them in a wax that can then be cast from silver. This gives a few different textures and grains to the final product. pic by James Bricknell / CNET Lace leveraged the power of the 3D printers it already had to create nylon versions of its most popular designs that you can purchase for just $3 a ring or $5 for a pack of three. The samples are sent to you in any size you need and are yours to keep, whether you buy the full metal version or not. It gives you a chance to test fit the rings from your own home in the same way you could if you were in the store, without having to be in LA. Read the full story by clicking below. Read the full article
Mueller Corp. – Case Study: The Endless Possibilities of SLA- Webinar on Demand
Mueller Corp. – Case Study: The Endless Possibilities of SLA Replayed from a live webinar held on Nov.29, 2022 Webinar on demand replay of a case study of Mueller Corporation, a user of Formlabs and their SLA technology. In this webinar, we will dive into the various applications for which Ryan Cummings, Manufacturing Engineer for Mueller Corp., uses his Form 3L. By printing manufacturing tools, prototypes, jigs, and fixtures, Mueller Corp. has been able to save time and money on their processes. Additionally, they consistently receive requests for new parts, masks, and prototypes, providing them to a diverse range of businesses. Learn about the circumstances that led Mueller Corp. to add a second Form 3L and a Form 3+ to their fleet and the numerous ways they are using additive manufacturing to continue growing their business. MUELLER CORP. CASE STUDY PDF
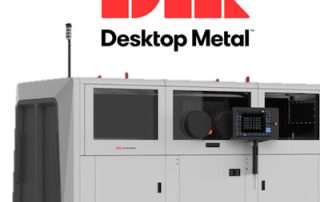
German Automaker Chooses Desktop Metal with Multi-million Dollar Order
Desktop Metal, Boston, Massachusetts, USA, has received a $9 million order from a major German automaker for its Binder Jetting (BJT) Additive Manufacturing machines for the mass production of powertrain components. This is the second order from the same automaker in fewer than twelve months, bringing the total amount of production AM machines purchased to $16.9 million to support digitally cast powertrain components for a popular car line. “The Additive Manufacturing industry continues to grow for mass production applications, with the most innovative companies in the world leading the way,” stated Ric Fulop, founder and CEO of Desktop Metal. “Our team is working with a significant number of global automotive OEMs to expand adoption of our differentiated AM technologies for end-use car components, and this most recent order further demonstrates our customer’s success changing the way they make products and supports team DM’s vision for Additive Manufacturing 2.0.” More Info on Desktop Metal
Headmade Launches M2 Tool Steel for ColdMetalFusion
reprint from Metal AM Headmade Materials GmbH, Unterpleichfeld, Germany, has announced it is expanding its portfolio of available materials for the ColdMetalFusion standard with the release of its new M2 tool steel material. Developed by Headmade, the M2 tool steel material is said to exhibit well-balanced toughness, wear resistance, and hardness properties, as well as part density of up to 99%. The M2 tool steel is a hardenable high-speed steel with a tungsten-molybdenum matrix suitable for a broad variety of applications and widely used for cutting tools such as twist drills, taps, milling cutters, saws, and knives. Worldwide, the M2 type is reputedly the most popular high-speed steel, having replaced grade T1 in most applications. The reasons for this are the materials’ wide heat-treating range as well as the excellent combination of properties. Headmade Materials was running the material in its pre-series program for advanced application development. After successful testing in the wake of a lead project for a cutting tool holder with ColdMetalFusion Alliance partner MIMplus, the company is now launching the M2 tool steel as a commercially available material. Headmade Materials intends to showcase this tool steel together with the already running commercial application at the booth of the ColdMetalFusion Alliance [...]

Manufacturing Grants Available for NJ
Recently, the New Jersey Economic Development Authority announced Manufacturing grants for New Jersey. This New Jersey Manufacturing Voucher Program is meant to assist those in the manufacturing industry with accessing updated equipment. (Software and Hardware) With this program, manufacturers who are actively contemplating but have not committed to the purchase of advanced manufacturing equipment can take advantage of the grant funds; including additive & subtractive manufacturing. Cimquest will happily assist in your research and/or purchase of manufacturing equipment. Since 1990, companies from startups to enterprises have worked with our company to bring their manufacturing ideas to life. We are the leading resource on the east coast, providing a complete range of advanced manufacturing products and services to keep customers ahead of the innovation curve. Our manufacturing solutions include Mastercam CAD/CAM software, a complete suite of 3D Printers with solutions from protoyping to production, including materials ranging from plastic, metal and wood. We also provide software and hardware solutions for scanning, reverse engineering and inspection. Applications for the New Jersey Manufacturing Voucher Program will be received on a rolling basis and will remain open until all of the funds are committed. More Details
Visit our Partners at FormNext 2022
This week, in Frankfurt, Germany, FormNext 2022 is underway until November 18th. This event is the meeting point for the next generation of Additive Manufacturing and industrial 3D Printing! With about 800 exhibitors, we are proud to announce that Cimquest will have many partners attending! Our partners range from entry-level 3D Printers to industrial systems, and depending upon your needs, one or multiple may be right for you. We also realize there isn’t an “all-in-one” additive manufacturing system that can accomplish everything, so our line of 3D Printers includes systems for plastic and metal. If you'd like more information about one of our specific partners or would like to contact us, you can do so here. You can also stop by our partners' booths right at FormNext to take a deep dive into the varying technologies and applications. Formlabs is great if you're looking for prints with fine feature details, injection-mold-quality surface finishes, or industrial capabilities at a desktop price. They can be found in Hall 11.1 at Booth #E11. HP provides a total end-to-end solution for prototyping and mid-run production. They also can produce isotropic end-use parts. They can be found in Hall 12.1 at Booth #D59. If you are interested in [...]